An ActiveStorage S3 Direct Uploader: Part 1: The Drag and Drop Interface
I'm an engineer, educator, and entrepreneur that has been building digital products for over 20 years with experience in startups, education, technical training, and developer ecosystems.
I founded Flatiron School in NYC where I taught thousands of people how to code. Previously, I was the founder of Designer Pages. Currently I'm the Chief Product Officer at Revature.
You want a fast fancy uploader to be an easy thing to implement. But it gets tricky. I'll do my best to explain how I built the Uploader for Musicbase using ActiveStorage and Direct Uploads to S3.
It might get complex and there are a lot of steps, but its worth it and you can totally do it.
If you want more resources on the topic, Chris has a great video on Activestorage with Direct Uploads.
The Setup
If you want to follow along, the first thing I did was clone my Rails Starter template. But any Rails app will do. The only thing that's special about my template for the sake of this demo is that it is using importmaps to manage JS dependencies. But we're not going to have any dependencies so it shouldn't matter.
You can follow along by following the commits in the series github repo.
Setup Your Model
We're going to use a Track model where a track will have a filename, title and artist_name. We'll also add a has_one_attached :audio_file to the model.
rails g model Track filename title artist_name
Then let's install ActiveStorage.
bin/rails active_storage:install
And finally lets add the has_one_attached :audio_file to the model.
app/models/track.rb
class Track < ApplicationRecord
  has_one_attached :audio_file
end
Run your migrations with rails db:migrate.
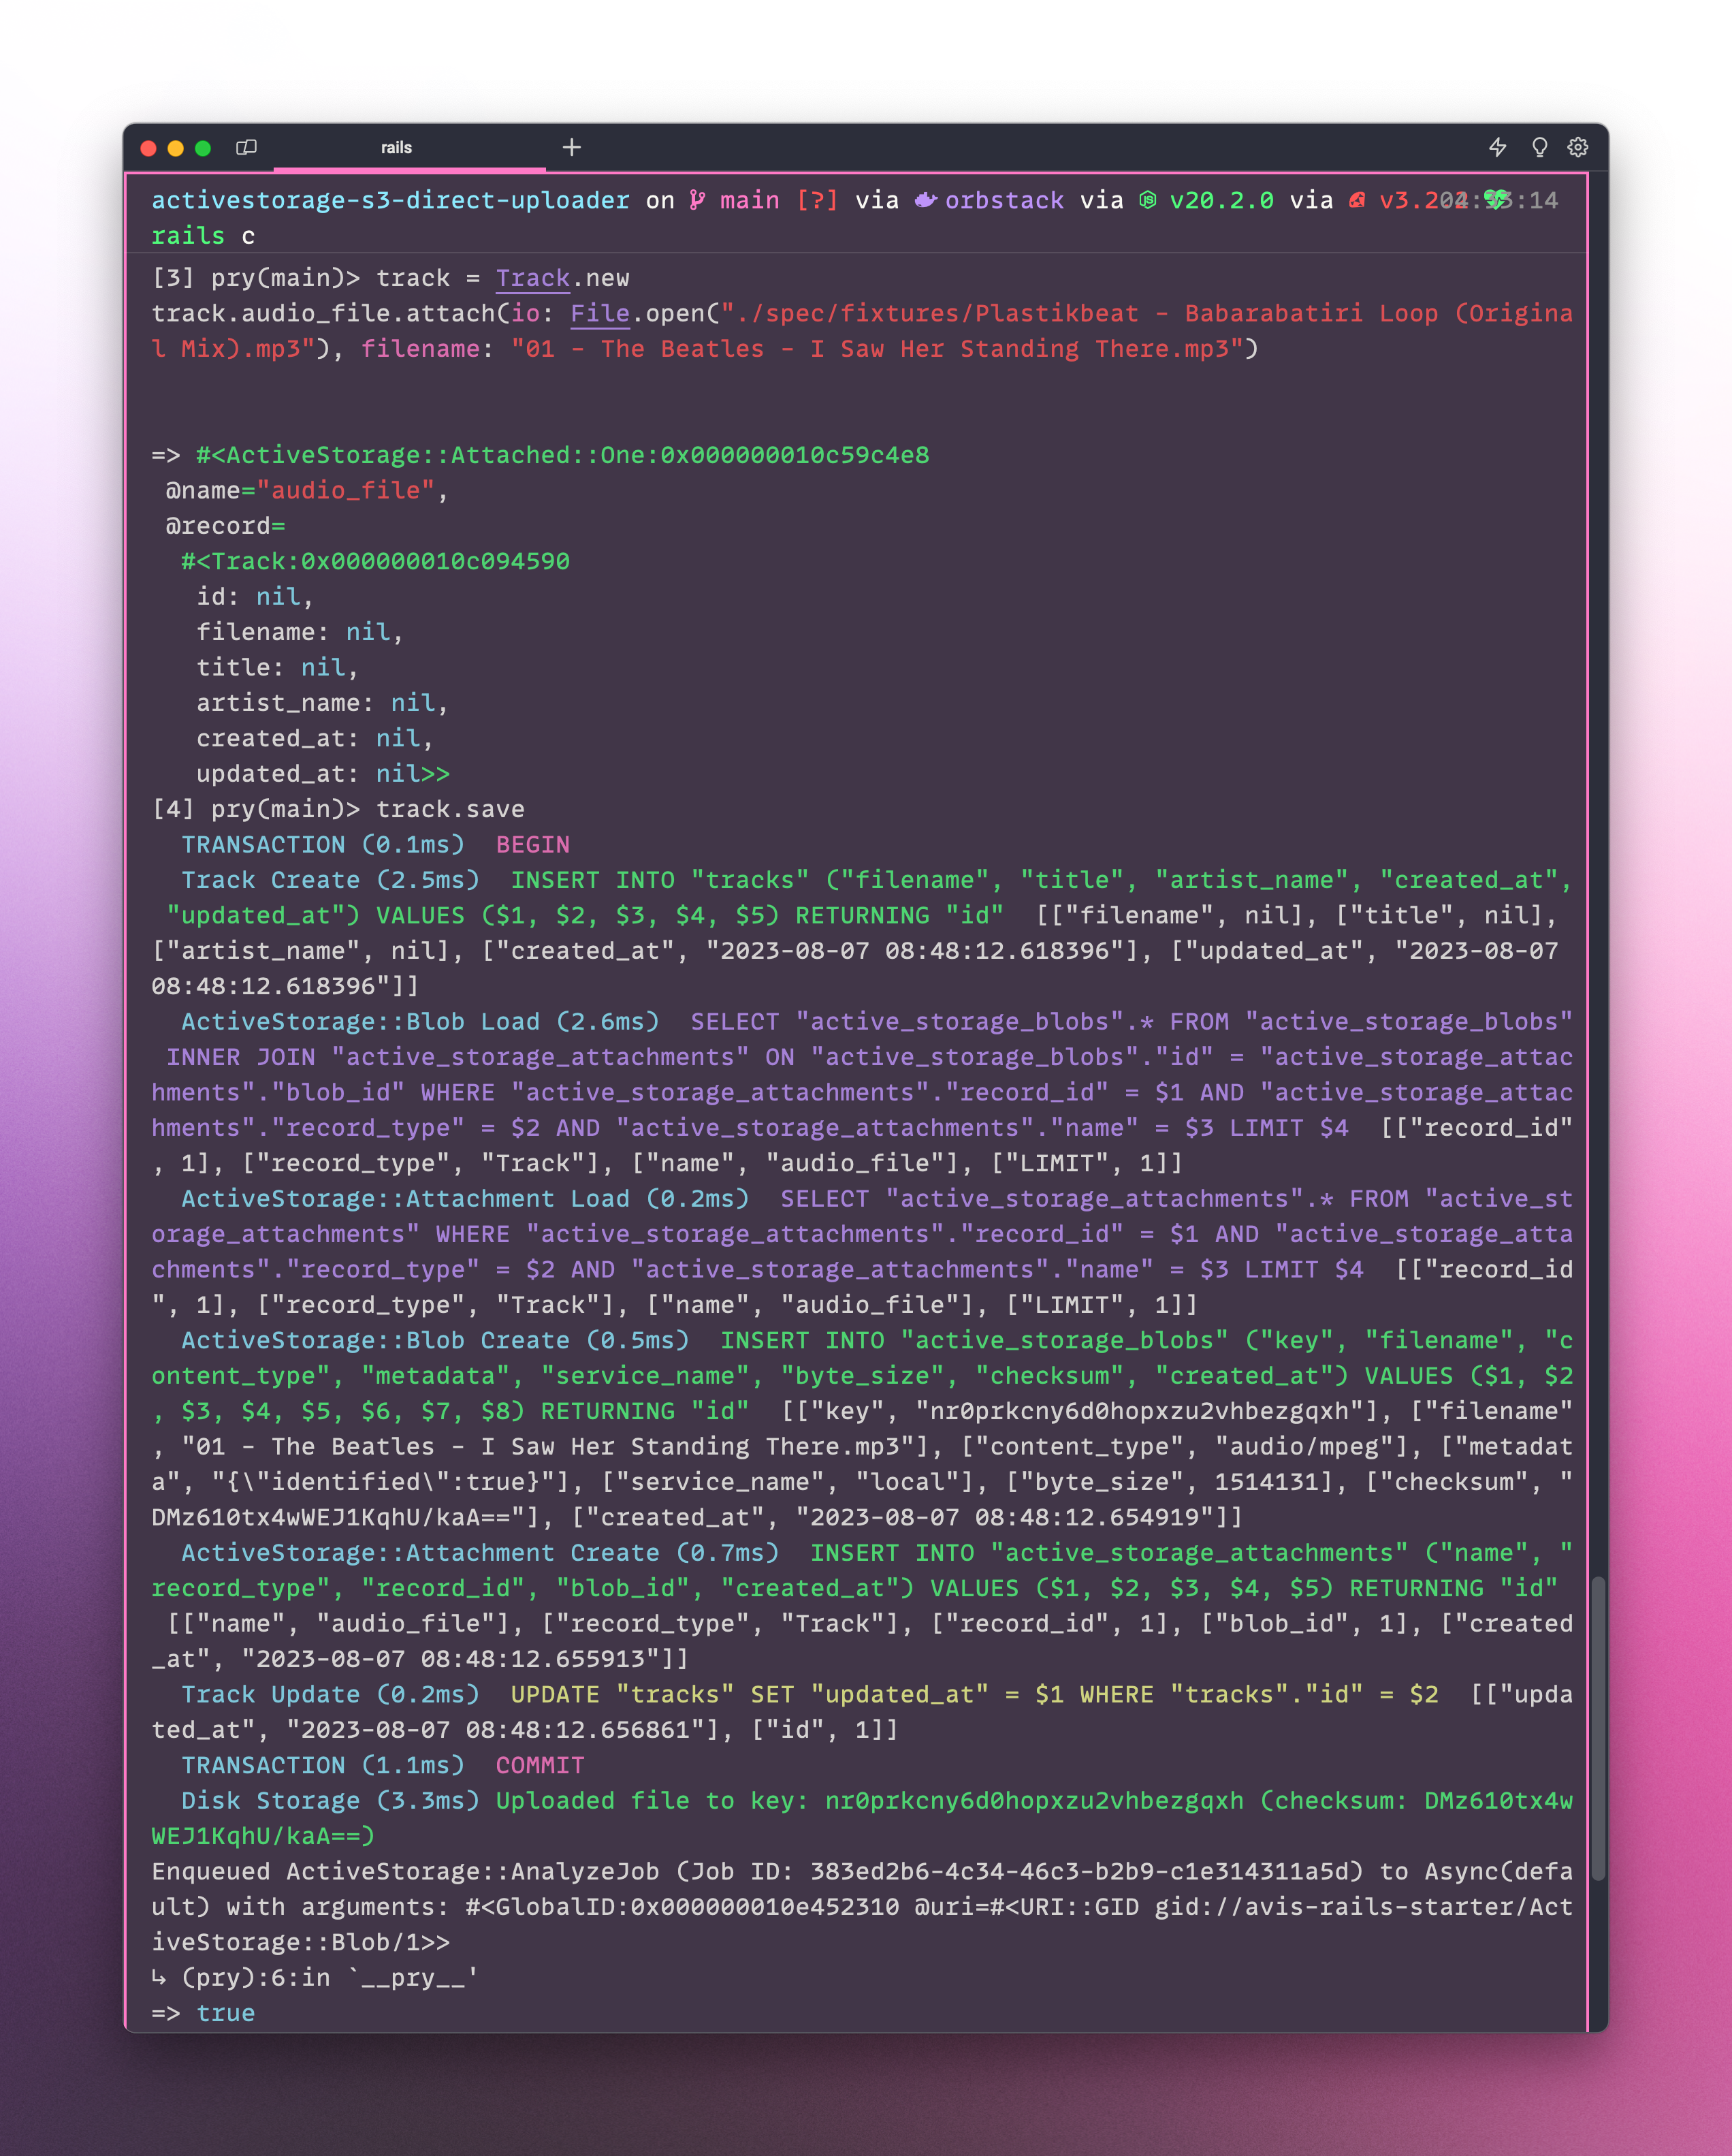
Let's make sure this worked by uploading an mp3 file to a new track in the console.
track = Track.new
track.audio_file.attach(io: File.open("./spec/fixtures/Plastikbeat - Babarabatiri Loop (Original Mix).mp3"), filename: "01 - The Beatles - I Saw Her Standing There.mp3")
track.save
If you want that file, you can grab it here and put it in spec/fixtures.
Setup S3
The next step is setting up S3. This has been covered in a lot of places, the Rails Guide are fine. Just make sure to configure the corect CORS settings for a direct upload.
And don't forget to add the aws-sdk-s3 gem with bundle add aws-sdk-s3.
Configure the Correct CORS for Your Bucket
Make sure you configure the correct CORS settings to allow direct uploads. Again, the Rails Guides on CORS are fine. Just make sure you edit the AllowedOrigins section. My CORS looked like this:
[
    {
        "AllowedHeaders": [
            "*"
        ],
        "AllowedMethods": [
            "PUT"
        ],
        "AllowedOrigins": [
            "http://localhost",
            "http://127.0.0.1",
            "http://localhost:3000",
            "http://127.0.0.1:3000"
        ],
        "ExposeHeaders": [
            "Origin",
            "Content-Type",
            "Content-MD5",
            "Content-Disposition"
        ],
        "MaxAgeSeconds": 3600
    }
]
Okay, I'm assuming that you setup S3 and changed your ActiveStorage settings to use S3/Amazon.
If you've done all that you should be able to create another track in your console as we did above and this time, after you track.save, try calling track.audio_file.url. You should get back a nice looking S3 URL.
The View
Let's setup our view.
overmind
If you're using my starter template, I use overmind to manage my processes. If you're not using overmind, I highly recommend it. Learn how to use overmind instead of foreman or here Without overmind, you can still run rails s but you should also run bin/rails tailwindcss:watch in another terminal.
If your app is working, you should see my nice starter page.
Tracks Controller
To get our views going, let's generate a tracks_controller with a new and create action.
rails g controller tracks new create
Let's go over to http://localhost:3000/tracks/new
To make our view, we're going to do two things.
First, let's drop the HTML we're going to use in our view.
app/views/tracks/new.html.erb
<div class="w-full">
  <div class="p-6">
    <div id="uploadzone">
      <button
        class="w-full rounded-lg bg-muted border-2 border-dashed border-gray-300 p-8 text-center hover:border-gray-400 focus:outline-none focus:ring-2 focus:ring-indigo-500 focus:ring-offset-2">
        <svg aria-hidden="true" width="24" height="24" viewBox="0 0 24 24" fill="none" stroke="currentColor" stroke-width="2" stroke-linecap="round" stroke-linejoin="round" class="mx-auto h-12 w-12 text-gray-400"><path d="M17.5 22h.5c.5 0 1-.2 1.4-.6.4-.4.6-.9.6-1.4V7.5L14.5 2H6c-.5 0-1 .2-1.4.6C4.2 3 4 3.5 4 4v3"></path><polyline points="14 2 14 8 20 8"></polyline><path d="M10 20v-1a2 2 0 1 1 4 0v1a2 2 0 1 1-4 0Z"></path><path d="M6 20v-1a2 2 0 1 0-4 0v1a2 2 0 1 0 4 0Z"></path><path d="M2 19v-3a6 6 0 0 1 12 0v3"></path></svg>
        <span class="mt-2 block text-sm font-semibold text-gray-900 dark:text-white">Drag Tracks to Upload or Click Here</span>
      </button>
    </div>
  </div>
  <div id="uploads" class="flex flex-col overflow-y-scroll divide-y border h-[calc(100vh-18em)]">
  </div>
</div>
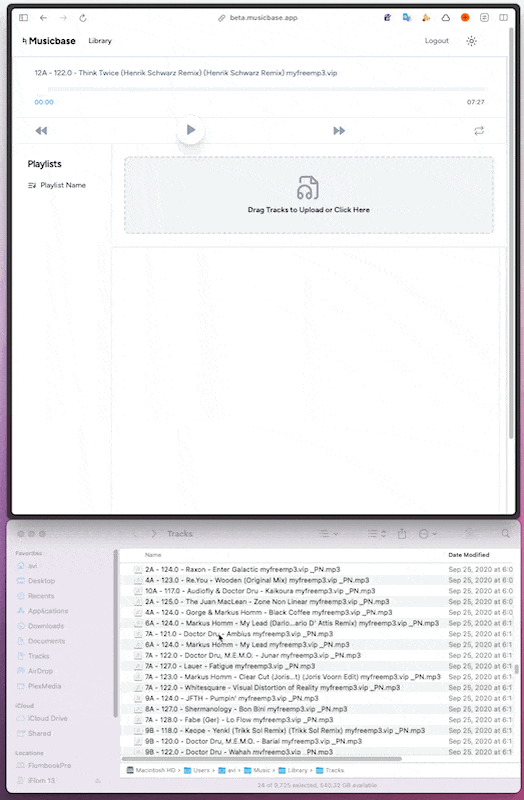
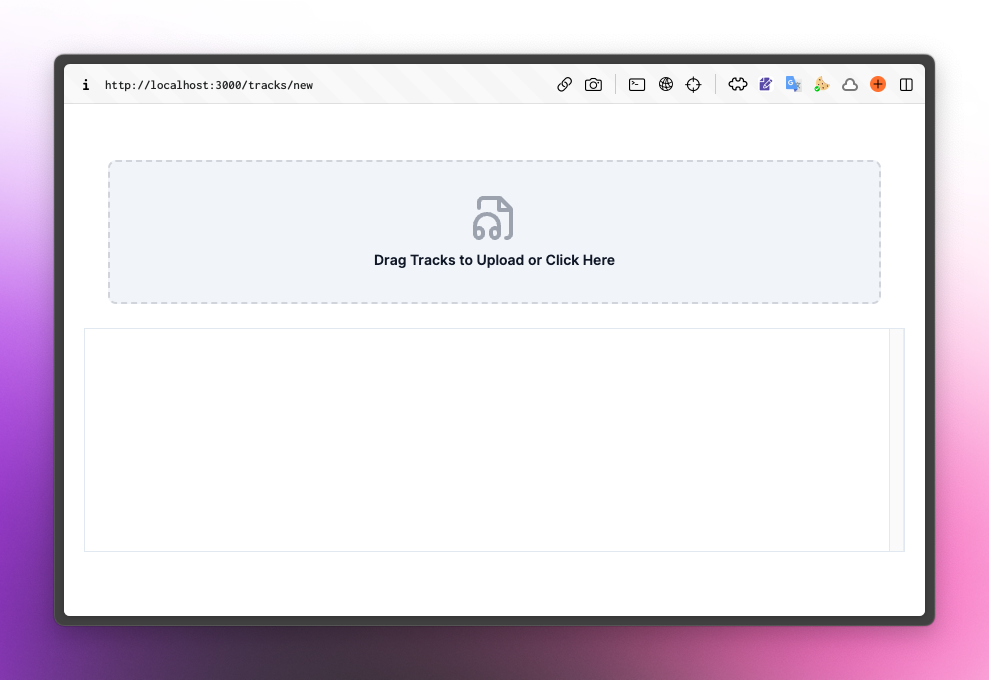
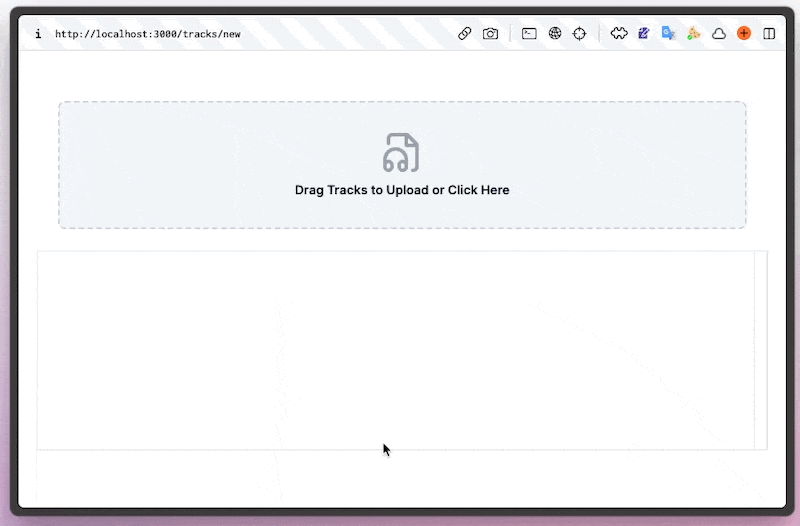
That's just a bunch of tailwind stuff but it'll make a pretty nice looking upload zone page with a locked container to store all the files that get uploaded in a scrollable window. It'll look like this:
You also have to open app/views/layouts/application.html.erb and change the margin top from 28 to 8 using mt-8.
Building the Upload Zone
We need to have our upload zone be able to accept files. We're going to use the HTML5 File API to do this but it's not that complicated. You could always use a great library like Dropzone.js, but I accidentally promised this would be dependency free even though I used Dropzone.js for production.
Triggering the File Upload
We need to make it so that when you click on the uploadzone it triggers the familiar File Upload dialog. We're going to do this with a little bit of JavaScript.
The first step is adding a hidden file input field to our HTML, <input type="file" class="hidden" multiple />.
Let's now create a stimulus controller to handle the upload zone.
rails g stimulus uploadzone
Let's build a method in the controller to handle the triggering of the file upload dialog.
app/javascript/controllers/uploadzone_controller.js
import { Controller } from "@hotwired/stimulus"

export default class extends Controller {
  connect() {}

  trigger() {
    this.element.querySelector("input[type=file]").click();
  }
}
Before we talk about refactoring that at all, let's add the controller and action to our HTML.
Let's make the entire uploadzone div bound to the stimulus controller and add a click event to it.
Edit app/views/tracks/new.html.erb and add the following to the uploadzone div.
<div id="uploadzone" data-controller="uploadzone" data-action="click->uploadzone#trigger">
Now, when you click on the uploadzone div, it'll trigger the trigger method in the controller which will click the hidden file input which will trigger the dialog.
Lovely.
Refactor to Use a Target
Instead of doing our querySelector, let's make the hidden file input a target of our controller named fileInput.
app/javascript/controllers/uploadzone_controller.js
import { Controller } from "@hotwired/stimulus";

export default class extends Controller {
  static targets = ["fileInput"];
  connect() {}

  trigger() {
    this.fileInputTarget.click();
  }
}
And in our HTML, to bind the file input as a target:
app/views/tracks/new.html.erb
<input type="file" class="hidden" multiple data-uploadzone-target="fileInput">
Everything should still work.
Drag and Drop
Preventing Default Drag and Drop Behavior
Now that we have the file input triggering, let's make it so that we can drag and drop files into the uploadzone.
In order to do this, the first thing we need to do is prevent the browser from doing what it normally does when you do a drag and drop.
Let's add this to our stimulus controller:
app/javascript/controllers/uploadzone_controller.js
connect() {
  this.element.addEventListener("dragover", this.preventDragDefaults);
  this.element.addEventListener("dragenter", this.preventDragDefaults);
}

disconnect() {
  this.element.removeEventListener("dragover", this.preventDragDefaults);
  this.element.removeEventListener("dragenter", this.preventDragDefaults);
}

preventDragDefaults(e) {
  e.preventDefault();
  e.stopPropagation();
}
Because our uploadzone is bound to the entire div we want to monitor for the drag and drop, we can do this in our connect hook. this.element represents that uploadzone div, the element of the controller. We're adding listeners to dragover and dragenter which will tell the browser to not do what they normally do by calling our preventDragDefaults method.
When the controller disconnects, let's clean that up by removing the listeners.
You should be able to drag a file into the space and see nothing happen (as opposed to the browser opening your file).
Accepting Files from the Drag and Drop
Now that we've prevented the browser from doing what it normally does, we need to accept the files that are being dragged into the uploadzone. Let's bind another action to our uploadzone div, drop->uploadzone#acceptFiles.
app/views/tracks/new.html.erb
<div id="uploadzone" data-controller="uploadzone" data-action="click->uploadzone#trigger drop->uploadzone#acceptFiles">
That will make it so that when we drop files into the uploadzone, it'll call the acceptFiles method in our controller.
app/javascript/controllers/uploadzone_controller.js
acceptFiles(event) {
  event.preventDefault();
  const files = event.dataTransfer.files
  debugger;
}
We're going to use the dataTransfer property of the event to get the files that were dropped into the uploadzone. If you now drop a file into the uploadzone, you'll see that the files variable is an array of files in your debugger.
Quick Recap
- Set up the HTML for the uploadzone.
- Set up the stimulus controller to handle the triggering of the file upload dialog.
- Set up the stimulus controller to handle the drag and drop of files into the uploadzone.
- Set up the stimulus controller to accept the files that were dragged into the uploadzone.
Our drag and drop left us with a nice array of files that we're going to be able to pass off to some function that handles uploading them. However, we didn't get left with a nice array of files after the click of the uploadzone. Let's fix that so that we have parity between the events, at the end of the file dialog and at the end of the drag and drop we should be left with a nice array of files to pass off to some upload function.
Getting Files from the File Dialog
The file dialog when completed changes the value of the file input. We can use that to get the files that were selected. We're actually going to be able to re-use our acceptFiles method to do this after a slight modification.
Let's add a change event to our file input in our HTML.
app/views/tracks/new.html.erb
<input type="file" class="hidden" multiple data-uploadzone-target="fileInput" data-action="change->uploadzone#acceptFiles">
Now when that input is changed it will send that event to our acceptFiles method.
What we want to do is modify our acceptFiles to either look for drag and drop dataTransfer files or from files from the file input.
app/javascript/controllers/uploadzone_controller.js
acceptFiles(event) {
 event.preventDefault();
 const files = event.dataTransfer ? event.dataTransfer.files : event.target.files;
 debugger;
}
If event.dataTransfer exists, we know the event was the drag and drop and we can get the files from the dataTransfer. Otherwise, we know the event was from the file input and we can get the files from the target.files.
What We've Built
At this point we've basically built a Drag and Drop file upload component. In fact, we built the shadcn on rails dropzone component.
Cool, right? Now we're ready for the upload which we will cover in part 2 tomorrow.